The Brief
I regularly perform with a number of groups ranging from small ensembles, to choirs and full orchestras. For a long time now I’ve been wanting to have a simple recording setup which I could use to make high quality recordings of these events, mostly for personal use but also with an eye towards making CDs either just for members of the band, or maybe for commercial sale at a later date.
Although I wanted to be able to get good recording results I also needed to have a setup which was unobtrusive (no obvious microphones on stage), quick to set up and which wouldn’t require monitoring during the concert (because I have to play in it!).
The Setup
Having done a bit of research I quickly came to the conclusion that the ideal setup for this kind of recording would be a simple pair of condenser microphones which could be mounted on a high stand a few meters behind the conductor. This avoids the need to have individual microphones for individual instruments or sections, but can hopefully get close enough to the players to avoid sounding like a purely ambient recording. Since most of my concerts take place in churches it would be easy to set up in the central aisle. Using this setup on a proper stage might be an issue, and would probably require the microphones to be suspended above the audience rather than put on a floor stand.
The recorder
I looked at several options when working out how I was actually going to record the sound. Older technologies such as DAT tapes and minidiscs were dismissed, DAT is too big and fragile (and tape is a pain), and minidiscs are dying and lossy. My original intention was to record straight onto a laptop. However I wanted a setup which was unobtrusive, which means using a netbook. Recoding this way would mean that I’d have to leave the computer open and running during the concert which would make it difficult to secure – most netbooks are also not completely silent which might be distracting for people sitting near to it. Most importantly though, the sound hardware in every netbook I tried is terrible. Even if you feed it a high quality signal then the internal hardware will add a significant amount of noise to the eventual recording. You can get around this by using an external sound module which feeds into the laptop over USB, but this makes the whole setup more complicated and adds quite a lot to the cost.
In recent years there have been quite a few dedicated solid state recorders released. These generally have inbuilt microphones, some of which can be pretty good, but may also have the option to record from an external sound source. They generally record to an SD card so there are no moving parts and the units operate in complete silence.
Having seriously considered a couple of these units I found a couple of problems. Firstly, the batteries of most of these units have a lifespan which wouldn’t be enough to comfortably record a rehearsal and concert in the same session without getting worried about them running out and the recharge time ran to several hours. Secondly, although the internal mics on these units can be very good I wanted the option to use good professional microphones as an input. The ideal microphones for this type of recording are small diaphragm condensers, and to work properly these require power (termed phantom power) to be sent to the microphones from the recorder. Most of the recorders only have mini-jack connectors for the inputs and have no facility to provide phantom power. To use these would therefore require a more complicated external power supply to power the mics.
My final solution therefore was the Tascam DR-100. Although this is at the expensive end of this type of recorder it has the big advantage that in addition to the (really very good) directional microphones on the unit, it also has two XLR inputs on the bottom which can take a feed from an external microphone, and which can supply 48V phantom power to allow you to use condenser microphones without the need for additional hardware.
The audio hardware inside the DR-100 is excellent and every review I read commented how, even at high levels of gain (which you generally need to use) introduces virtually no noise. It has the ability to record direct to MP3 if you want to be able to leave it running for hours on end, but can also record 24-bit wav files which are high enough quality for any application to which you might want to put your recording. Half a concert recorded uncompressed at 24-bit easily fits on 2GB SD card, so you just need to swap cards in the interval.
Microphones
I should state up front that I am not a sound engineer or even an audiophile. Having done some preliminary tests with the onboard mics on the DR-100 I was actually quite happy with the quality of sound I could record – although I could hear that it could be improved. The biggest problem with using the onboard mics though is being able to position them correctly. The DR-100 is quite small, but you can’t mount it on a high stand easily, and even if you could you can see or get to any of the controls. I tried recording concerts from the front row of the audience, or from a point behind the orchestra, but found that the balance of the sound was too poor to use.
I therefore spent quite a long time researching options for good quality microphones. I soon found out that:
- There is no single correct answer. Any microphone you care to mention will have both great and awful reviews depending on which site you look at. I tended to go on weight of evidence, but don’t really have any way of judging how well my current setup is performing relative to what I would have got with a different choice of mics.
- The sort of microphones you need for this kind of recording range in price from really expensive to really expensive. In the end the microphones in my setup cost about as much as everything else put together. There isn’t a way around this – if you want to do it you just need to bite the bullet and open your wallet.
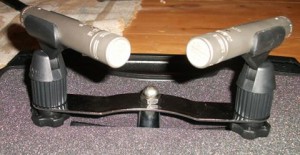
My intention was to get two condenser microphones which would then be mounted in a crossed stereo pair, where the microphones are positioned at right angles to each other with the diaphragms positioned close together.
My choice in the end was a pair of Rode NT5 microphones. Of all of the microphones I researched these were the ones which had the most consistently good reviews. There are also a number of example recordings available made with these microphones which sounded excellent so these were what I ended up with.
I ordered a matched pair of mics which should be ideal for using for stereo recording. However when using them I’ve found that they show very different input levels when recording onto the DR-100 (approx 1-2 stops on the gain selector), which doesn’t make them very matched – however I’ve not been systematically through all the pieces of the setup to confirm that it’s definitely the mics so I’m going to reserve judgement on this.
I have been very impressed by the quality of sound I can get from the NT5s. I’ve used them both for full concert records, but also for close micing of individual instruments and have had consistently excellent results. Getting the placement of the mics right has proved to be critical. For close micing moving the mics a few centimetres can make a big difference to the sound produced, and for concert recording getting correct separation and angle of the microphones is crucial (but it doesn’t take too much playing around to find it).

Setup
Since I wanted to end up with a recording setup which was self-contained and could be left out during a concert without fear of having it damaged or disturbed I needed to add some more bits of kit. Basic things I had to get were:
- A pair of 5m XLR cables. Nothing special about these. I may get longer ones at some point to give me a bit more flexibility to position the recording gear exactly where I want.
- A boom stand. I got a relatively cheap boom stand from Tiger Stands however despite the cheap price this turned out to be a really solid piece of kit. Fully extended this can raise the mics at least 3m up. Ideally I’d like them a little higher, but that would require a more expensive stand, which would also have to have a larger footprint. This stand doesn’t completely fill the aisle and even fully extended the stand seems to be pretty stable.
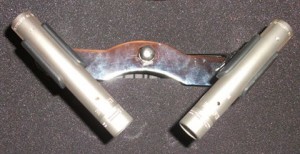
- A stereo microphone mount. I spent a while looking for this. There are some ridiculously expensive mounts around for creating a stereo pair of microphones. In the end I went for this simple mount from a site which mostly seems to see old records. For less than £5 I have a perfectly good stereo mount. The clips for the actual microphones were supplied with the NT5s.
- A long power extension cord (10m) since often the nearest powerpoint is further away from the aisle than you’d like. I’m thinking about carrying a second extension as I’ve already had a close shave where the 10m was only just long enough. Some churches don’t have a wide selection of power points available!
- A power adapter for the DR-100 so I can run it continuously without having to worry about the battery. If anything happens to the power the unit will run without power for at least 30 mins, and this could be extended futher if I were to put in an external battery to the DR-100.
- A pair of headphones. I have a relatively cheap pair of Sennheiser HD-201 headphones which have proved to be fine for monitoring the recording setup.
- A small study plastic box in which I can keep sundry items such as the remote control and USB cable for the DR-100, spare SD cards and that kind of stuff.
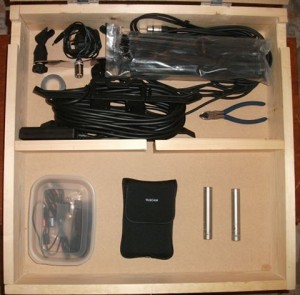
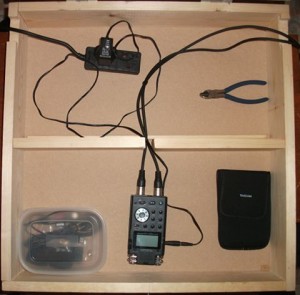
I wanted to have a case which I could use to store the recording gear and which could also be used to house the gear during a concert. Since this was likely to be too specialised to purchase I ended up making one. The case is about 60cm x 60cm x 15cm. It’s pretty sturdy – so much so that you can stand on it without problem. The inside is split into two compartments, the rear compartment is left blank and is used for cables, the stereo mount and anything else which isn’t fragile. The front compartment will be filled with foam containing cutouts for the recorder, headphones and microphones.
The case has cutouts at the back which allow power and XLR cables to pass into it. The case can be padlocked shut, and can be left like that whilst recording so it can be relatively safely left unattended during a concert. The security is only superficial, but it’s enough to stop people tampering with the equipment out of curiosity. Finally the case has a handle on the side, so I can leave everything in place so I just need to grab the case and the boom stand and I’m good to go.
There are a couple of additional items I want to add to the setup.
- Some rubber cable covers to place over exposed cables to stop people tripping over them
- Gaffer tape – because you never know what you need to stick down
- Some kind of case for SD cards so I can keep track of which recordings are on which cards
Post-processing
After I’ve done on the on-site recording I am not trying to do any complicated mixing. Post processing consists only of sorting out levels, adjusting the equalisation and splitting the recording into tracks. For these simple processes I’m using Audacity on a Mac which seems to fit the bill very well.
Summary
In total I reckon the setup I’ve created has cost me around £900, which is a bit more than I set out to spend, but I now have a simple and yet versatile setup which is suitable to record a number of different types of event. I shall make regular use of this so the investment will hopefully be worth it. Also the quality of the recordings is such that I can make CDs from them, which will hopefully allow me to raise some money for the groups with which I play.


