Important Disclaimer
This is merely a description of some work I did on my own Casio PX5S. I am not a Casio service engineer, nor indeed anything to do with Casio. If you choose to do any work on your own keyboard you do so at your own risk. There is a nonzero chance that devling into your keyboard will leave it in a more broken state than it started, and following any of the instructions below will almost certainly invalidate any warranty you have on your instrument.
If you have the option of getting Casio to fix your keyboard, I stronly suggest you do that instead of anything laid out below.
Background
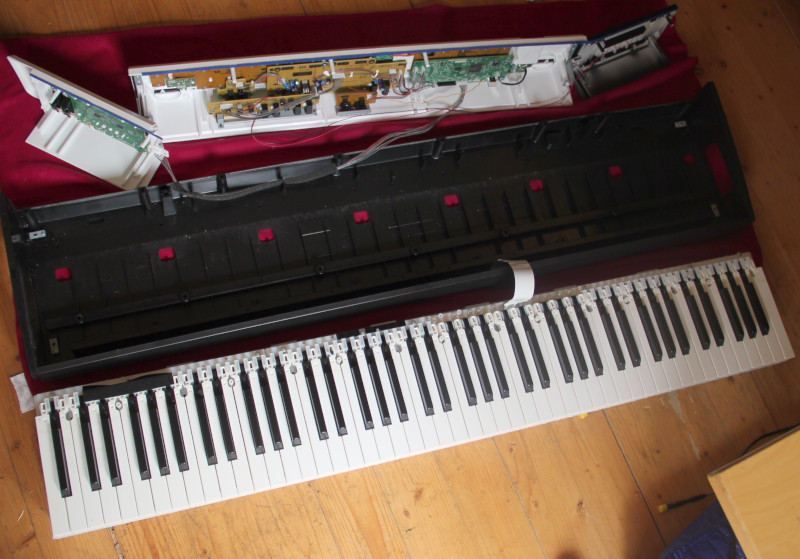
This is a record of a disassembly and maintainance I did on my keyboard recently. The board had developed a problem where certain keys would either sound at full velocity even when played quietly, or would sometimes play notes twice from a single press. The problems were limited to a small number of keys, but the problem was bad enough that we couldn’t use the board for gigs any more. The keyboard was well out of warrently and has had a pretty tough life so I can’t feel too bad about the breakage, and I also couldn’t really justify paying the shipping and repair costs to get Casio to look at it, so I had a shot to nothing at fixing it myself.
Tools and Preparation
For this job the tools I used were
- A medium sized phillips scredriver with a magnetised head (you definitely need a magnetised head or you’re in for a world of hurt)
- A small phillips screwdriver (probbaly around a 1-2mm head).
- Two small flat head screwdrivers (again around 1-2mm heads).
- A small pair of long nosed pliers
Before starting make sure the board has all power, audio, pedals and other cables removed. Also remove any USB stick from the drive port. I did most of the work on a blanket on the floor, but if you have a large table then I’d use that instead as my knees are killing me after doing this for 3 hours. Put a thick blanket under the board to keep it stable and to prevent scratches.
Disassembly
Step 1: Remove the battery cover

Undo the two thunb screws at the back and pull off the cover.
Step 2: Remove the right hand end panel

Undo the two screws on the right-hand end panel and then with a little jiggling the end panel should come off.
Step 3: Remove the left-hand end panel

The same proceedure as for the right-hand end. Removing the panel takes a bit more wiggling as it overlaps the main cowling more, but it only takes the removal of the two screws to release it.
Step 4: Remove the top button panel
The next step is to remove the main top cowling which runs the entire width of the board. To do this you need to remove a number of different sets of screws.
Firstly you need to remove the two retaining screws from each side of the keyboard side walls which you have just uncovered.


Next you need to turn the board over onto its back. Turn it so the keys are face down.
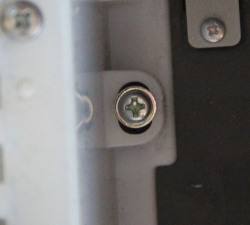
You need to undo some, but not all, of the screws on the bottom of the instrument. There are two types of screw you need to remove,
- Any screws which are deeply recessed into the board (ie not those which are just flush on the surface)
- You need to undo the small screws on the set of flapped covers which run along the length of the underside of the board and then remove the screws they conceal.
These two sets of screws between them are the last parts which retain the cowling to the top of the board.


The deeply recessed screws are pretty easy to remove. The problem is the ones under the flaps. These do not sit in a channel and you have to reach a long way through the weighing mechanism to get to them.


A couple of tips for removing the screws behind the flaps.
Firstly, if you can see a plastic bar sitting across the hole then use a screwdriver to gently move it to the side. You need to have a straight line through to the screw.
This is where you’ll need your magnetic screwdriver. If you drop the screw it will go into the bowels of the key mechanism and will be a right pain to get out!
Once all the screws are out you should be able to lift the top cowling off. Be careful, it’s in 3 pieces which all need to move together. As it comes up just tip it back so it rotates around and lies behind the keys. Lots of wires connect the different parts of the cowling as well as connecting the cowling to the keyboard, so be gentle!

Step 5: Disconnect the cowling from the keybed.
The cowling and the keybed are connected by a single ribbon connector, and if you remove this then you can completely separate the two parts.

To remove the ribbon you need to pull on a little collar at the top of the black connector mounted to the circuit board. It only moves up about a millimeter and you need to make it move up at both sides. Once it’s moved up you should be able to easily pull on the ribbon to make it come out of the base connector. I used the flat edge of a small screwdriver to help lever up the collar to the connector but you need next to no force to make it come up. The ribbon should pretty much fall out once the collar is up.

Step 6: Release the keybed from the case.
To atually do anything with the key mechanisms you need to remove the keybed from the remainder of the bottom of the case.
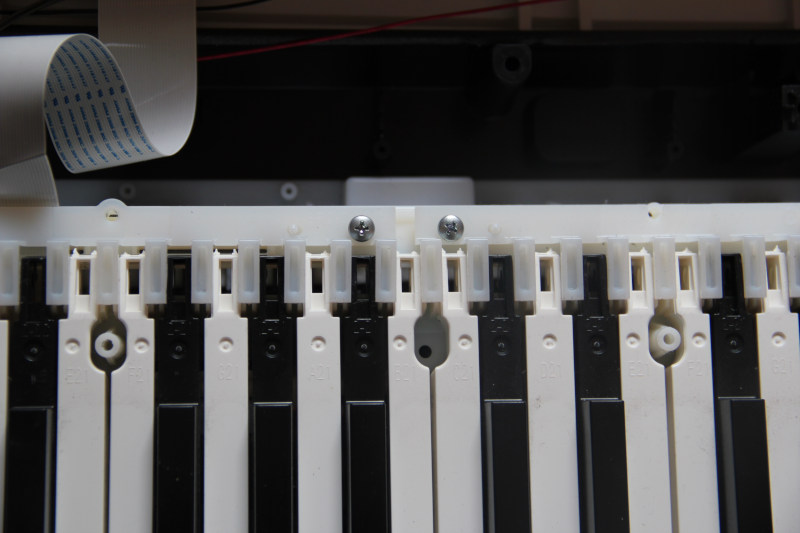
There are 3 initial screws to remove from the top of the keyboard. One at each end and one in the middle.


Once these are removed then you can turn the board over again (keys side down), and remove all of the remaining surface mount screws. The only screws you don’t need to remove are two pairs of small screws holiding a short rectangular plastic section (around 1.5 cm long). These can stay in place. Everything else on the bottom needs to come out.
When this is done you can turn the board back over (carefully! – since nothing is holding it into the case any more). Then you can lift the keybed out of the case. Support it from both ends as you lift it out. It’s not very strong when removed from the case.
How much more disassembly you need to do will depend on what you want to get at on your board. I’ve seen quite a lot of people with keys stuck up in the air, and you can probably fix this at this point by looking at the weighting action on the underside of the keybed.
Anything involving the key contacts, or keys being disconnected from the weighting mechanism will need further disassembly though.
Step 7: Removing the keys
The next step of disassembly is to remove the actual keys from the underlying board.
The first thing to do is to remove the plasic covers which are screwed over the rear of the keys. There are several of them and they have 3 screws each. Make sure you keep track of the order they are in – I’m not sure if they’re all indentical, so better safe than sorry.
Next you need to remove the actual keys. These are held to the board by a pair of platic clips at the back end of the key. Each key has two holes at the back and the two protruding pices of plastic on the back of the keybed that the key clips in to. Further down the key there is a groove where the weighting mechanism clips in, but this just rests in place – there isn’t anything to release.

To get the keys out I used a pair of small screwdrivers. I found two different ways to do it and between them they allowed me to get all of the keys off.
One way was to place a screwdriver under the back of the key and gently lever it up. Whilst doing this I pushed the other screwdriver down each side of the key alternately to release each side until the back of the key came up and free.

The other method was to put both screwdrivers down opposite sides of the key – just in front of where the pastic clip attached, then lever up to release the key.

Each key is individually named., so keep them in the right order as you remove them.
When removing the black keys, you can’t release the key until the white key to the right of it has been removed, so be careful about the order in which keys are removed.
By working your way along the keybed you should be able to remove all of the keys from the board.

Step 8: Removing the key membrane
Underneath the keys is a rubber membrane with a raised section for each key. Each raised section contains 3 rubber contacts, set at different heights, which make contact with 3 switches on the underlying board. It is the timing of the closure of these switches which registers a keypress and its velocity.
In my case, some of these presses weren’t registering properly, so I needed to get at the underlying contacts.
The rubber membrane is held onto the board by a series of protruding rubber “feet” which stick out from the membrane and then thread through the board underneath.
To remove the membrane you can VERY GENTLY pull on the edges of the membrane to pull the “feet” back through the board and release the membrane. This will then expose the contacts underneath. There are several sections of membrane and you will need to remove them all. As before, make sure you preserve the order in which you detach them.


With the membranes removed you can now clean the contacts, the plastic of the keybed, and the contact points on the actual membranes themseleves.
Reassembly
Reassembly is mostly just the reverse of disassembly – with the exception of reattaching the membrane. This is a nasty little job.
**UPDATE**
Other people have reported that they were able to re-attach the membrane from the top without unscrewing the sensors from the chassais. They used a thin stick to push onto the top of the rubber feet until they went through the holes. If this works it makes reassembly *much* easier so definitely try that – I haven’t re-opened my PX5S since hearing about this but will definitely give it a try next time.
**END UPDATE**
I couldn’t find a way to reattach the membrane from the top. The only way to get it to fix to the board was to push the thin part of each foot through the board, and then gently pull on it to pull the thicker part through and make it attach. The problem though is that you can’t get at the bottom of the board. The only way I found to do this is to remove the board from the casing.
There are a set of small screws at the back end of the board. If you undo these then the board pulls out.

This is made harder by the fact that the board is in 3 separate sections, and that the ends of the membranes don’t line up with the ends of the boards, so you need to take them all out at once, attach all of the membranes, and then re-attach the boards back to the plastic case, without detaching any of the feet again. This is really fidlly!

The amount of rubber you have to grab hold of to reattach the membranes is pretty small. I found it easiest to use a small pair of long-nosed pliers to GENTLY grab and pull each foot, until they were all re-attached. It took me a couple of goes to get them all down properly.
Some tips for rebuilding
As when you detached them, you need to make sure that each black key is attached before attaching the white key above it.
When reattaching the cowling, make sure the 3 sections are clipped together properly before putting them back on top of the main case. Also, make sure that no wires get trapped when putting the cowling on.
When re-attaching the screws to the base don’t apply much force. The plastic of the base is pretty weak and it’s really easy to strip out the screw thread.
When putting the screws back though the little flaps, be really careful. If the screw falls off (and one of mine did) then you’re going to have to disassemble all of the case and remove the keybed to get it back!
You can test the board at the point at which you reattach the ribbon cable and it’s probably a good idea to do this to save a lot of assembly / disassembly if anything doesn’t work properly. Be careful, as there will be a lot of exposed contacts, so make sure nothing metal is touching that shouldn’t be – but the PX5S only has 12V DC internally so you’re not going to do anything bad to yourself (you can of course kill the board!)
2 Comments
Thank you, I probably need to remove the hammer too. It might have been damaged also. Are there pictures for that processe?
Sorry, I didn’t remove the hammers when I took mine apart. You can see them very clearly if you turn the keybed over once it’s out of the case.
If the key is being held up then it might be something really simple. The travel of the hammers is stopped by a semi-rigid strip of foam which runs along the length of the keybed. If one of the hammers gets forced beyond this foam then the hammer will stick up and you won’t just be able to pull it down. If you can get at the hammers you can just pull them back around the foam and back into place and the key should fall back to its normal position.
Let me know if you diagnose this, and send any extra pictures you take and I’ll add them to the post since I know this is an issue that other people have hit so it will be a useful addition.